New Website Under Construction
28 April 2015
My blogging goal has changed. I used to try and write complete 'How to' articles. Now I wish to find a voice in short observational posts. More of a weblog. The subject area that I would like to pursue in my new blog will be web application development. Anything Java related.
I am building the replacement website with Java and Java Server Faces (JSF). I am going with a Bootstrap look too. I like Bootstrap; it's easy to work with.
I cannot wait to start blogging again now I have formed a plan so I have started a blog about the creation of the new blog platform over a Blogspot.
I will be getting the first iteration of my new blog and website ready for the end of June 2015. Ready for Devoxx Krakow. I have my ticket and I cannot wait to go.
Read : New Website Under Construction
Character Replace with Apache Module mod_rewrite
09 April 2014
Using Apache Module mod_rewrite to do a character replace is a little fiddly. It's particularly fiddly when you need to send back a single 301 redirect. But, it's not impossible.
mod_rewrite Underscores to Hyphens
In this solution all underscores are replaced with hyphens before the final 301 redirect is sent to the browser.
RewriteRule ^(.*)_(.*)$ $1-$2 [N,E=redirect:true]
RewriteCond %{ENV:redirect} ^true$
RewriteRule (.*) $1 [R=301]
The solution I created above looks for a match that includes anything either side of an underscore plus an underscore. Both sides of the underscore are captured at the same time. At the end of the match the capture groups are put back together, this time with a hyphen between them. The 'N' flag indicates to mod_rewrite that the rewrite rules should be run agents the subject all over again. The subject is changed to reflect the last run before it's re-evaluated. This rerunning continues until there are no more matches.
Unfortunately, you cannot just add the 'R' redirect flag to the end of the rewrite rule akin to this:
RewriteRule ^(.*)_(.*)$ $1-$2 [N,R=301]
In this shorter unfit solution the 'R' flag is evaluated and the redirect is sent before the rewrite rule can be rerun. Therefore for each replaceable character a redirect is sent back over and over until all the characters have been replaced. This will create needless round trips between the client and the server.
The redirect 'R' flag cannot be on the same line as the 'N' flag in order for the 'N' flag to do its job. Therefore, the 'R' flag needs to follow another rewrite rule in order for the redirect to be sent back only once. The problem is there actually is no more rewriting to be done. The following rewrite rule works as anything will match the pattern triggering the 'R' flags function to send a redirect.
RewriteRule (.*) $1 [R=301]
However, having this rewrite rule on its own will make all requests that are filtered via this set of rules (.htaccess file etc.) redirect. Consequently, a rewrite condition needs to prevent all other request from being redirected and only allowing redirects where a character has been replaced in the main rewrite rule.
Using the 'E' flag allows you to set an environment variable. In this case the environment variable is set after the 'N' flag. It is set for each time the rewrite rule is run: don't forget the last run will not match as all replacements have completed.
The variable in my solution is named 'redirect' and given a String value of true. The solution uses the environment variable as a means to prevent or trigger the 'match all' rewrite rule so that the redirect can be sent back appropriately.
Read : Character Replace with Apache Module mod_rewrite
Add a Current Page CSS Marker with Less Logic
24 March 2014
In this post I describe how the logic needed to add a CSS current marker to a webpage can be achieved very simply with very little logic on the website's server. I look at why a current page marker is important and why we need to use them.
Good User Centered Design
When a website user sees a distinctly marked menu item he/she is instantly orientated to where within the website they are in terms of the website structure. Without a distinct marking a user cannot easily determine where they are within the website. A lack of marking leads to avoidable extra cognitive work on the user's part.
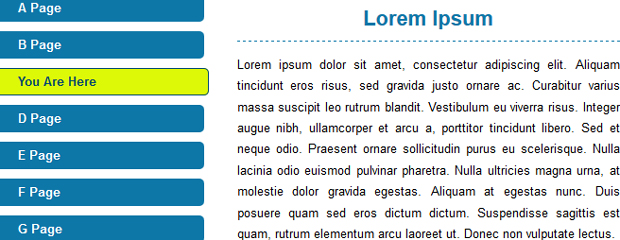
In providing a good user experience the burden of identifying where a user is, should be the concern of the website itself. Using CSS, the information can be conveyed to a normal sighted user with colour. The colour needs to unambiguously highlight the corresponding menu item related to the page the user is currently on.
It's common practice to achieve this by adding a marker via the use of a CSS class within the mark-up. The CSS class may have a name akin to 'current'. The CSS class is added, often server side, to the menu item during the creation of the menu. For example:
<ul id="nav">
	<li class="current"><a href="home">Home</a></li>
	<li><a href="about">About</a></li>
</ul>
Then using CSS such as the example below, the item will appear highlighted.
.current a
.current a:link
.current a:visited{
	Background-colour: #

}
Braking the Rules Elegantly
Here is the problem with adding a 'current' class. During the menu creation you have to get the server to repeat the decision: is this the item to add the class to? Ok, not a big problem and if you have already implemented this logic in old projects, it is probably better to leave it in.
However before you implement this logic into your next project, be aware there is a second way. I had this idea recently looking at this problem for myself for the first time. The solution that dawned uses less logic and not one 'if' statement.
I normally would say 'no way' to using a style attribute directly in a webpage's source because it breaks the rule of separation. Sometimes, however, breaking the rules can lead to a very elegant solutions. Elegant in this case because of a large reduction in the logic is removed from the menuing process.
How to Reduce the Logic
First, give a unique name to each page. Then simply use the unique name as a CSS class on every menu item.
<ul id="nav">
	<li class="home-page"><a href="home">Home</a></li>
	<li class="about-page"><a href="about">About</a></li>
</ul>
Second, output the name of the current page, as a CSS class, in the head element of the page's HTML each time the page is dispatched. Here is an example of how this may look using EL in JSP:
<style>
.${page.clsss} a
.${page.clsss} a:link
.${page.clsss} a:visited{
	Background-colour: #

}
</style>
Then, using the homepage as an example, the output would look like this:
<style>
.home-page a
.home-page a:link
.home-page a:visited{
	Background-colour: #

}
</style>
The CSS would then highlight the homepage as the current page. As soon as the user moves to another page, the class name within the style tag will change to reflect the name of the next current page.
This also means that the menu can be created and cached once for every time the menu is edited.
Read : Add a Current Page CSS Marker with Less Logic
You Can Validate Open Graph Metadata
09 February 2014
You can get the Open Graph metadata properties used by Facebook to validate. It's easy and it does not require any hacks. Read this if you need to get your Open Graph metadata to validate.
First Step to Validating Open Graph: HTML5
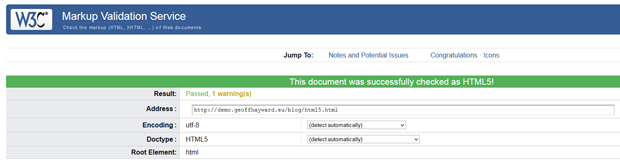
Your first step to getting Open Graph to validate is to check that your HTML is using a HTML5 doctype. The Open Graph metadata properties used by Facebook are designed to be used with HTML5.
If you are uncertain about the doctype you are using, you can get the W3C's Markup Validation Service to tell you.
Second step to Validating Open Graph: OG namespace
Your second step to getting Open Graph to validate is to get the OG namespace in scope. The OG namespace is what you see prefixed to the value of each of the property attributes of each of the Open Graph meta elements, such as: 'og:title', 'og:image', and so on.
You import the Open Graph schema and create the OG namespace using the HTML5 native attribute named 'prefix'. The import instruction of the Open Graph schema can be added to the HTML element named 'HTML' or to the element 'HEAD'.
<!DOCTYPE html>
<html prefix="og:  http://ogp.me/ns#">
<head>
[...]
<meta property="og:title" content="...">
<meta property="og:image" content="...">
<meta property="og:site_name" content="...">
<meta property="og:description" content="...">
<meta property="og:url" content="...">
<meta property="og:type" content="...">
</head>
[...]
</html>
That's all there is to it. Just import the OG schema in a HTML5 doctype and your HTML will validate.
Read : You Can Validate Open Graph Metadata
Pinning PuTTY to the Start Menu
20 January 2014
Most software that the Window OS has installed can easily be pinned to the Windows 8 start menu. However, not all software out there is installed onto your system via an installer. Some software is just an executable file or folder. This is fine but how do you pin it to the Windows 8 start menu? Easy, just follow my tip.
Pinning via a Shortcut
Let say you have downloaded software like PuTTY and you would like to use it often. In the past you may have kept it on your desktop. You still can, however, the start menu is kind of the new desktop when it comes to shortcuts.
The first thing to do is put the unzipped executable software into a tidy place within your system. I normally manually add software of this sort to program files. Once you have added the executable program to a tidy place head over to the Windows desktop. Right click the desktop's main area and select 'add a new shortcut'. The shortcut is only temporary so don't worry about adding clutter. Step through the new shortcut wizard. Once the shortcut has been created, simply right click it and select the option 'Pin to Start'.
Tidying up the Shortcut
If you have followed the steps in the last section of this post, you will find that the software linked to the shortcut is now pinned to your Windows start menu. To tidy up, all you need to do is drag the shortcut over to the recycle bin. After emptying the recycle bin, you will find that the executable software continues to be pinned to the start menu.
You will find that the pinned item will stay pinned until you decide to unpin it yourself. Assuming that you have not unpinned it, you will also find that the start menu's search will list the software for you now too.
Read : Pinning PuTTY to the Start Menu