Sending a 404 with JSF's FacesContext
08 December 2015
Sending a 404 "page not found" response with JSF is easily achieved. In the example below a 404 "page not found" is sent back to the requester if a search on a primary key does not yield a result.
 public Post findPost(Long id) throws IOException {
        Post post =em.find(Post.class, id);
        if (post == null) {
            FacesContext.getCurrentInstance().getExternalContext().responseSendError(HttpServletResponse.SC_NOT_FOUND, "Page not found");
            FacesContext.getCurrentInstance().responseComplete();
        }
        return post;
    }
As can be seen from the example: to send a 404 "page not found" response with JSF you need to get the external context via the 'FacesContext' object. Then using the external context, of the JSF, set the response code. In this case the response code is an error. Finally, It's important to complete the response to halt server side processing.
Read : Sending a 404 with JSF's FacesContext
Ready for the FabLab Edison Hackathon
24 November 2015
During this coming Thursday's Edison Hackathon, at the FabLab, I am hoping to control a robot car by voice. In preparation I have made a JavaFX voice controller UI. And I have put together a 4-wheel drive robot car chassis kit.
The voice controller uses the IBM Watson Speech to Text service. Since recording the video below I have tried commands with context such as "turn left", "reverse the car ". This has had better results. Using phrases, I added regex (word matching) to pull out the commanding verb from the phrase. The commands are then sent as HTTP GET request to whatever IP address and port is given. The Edison will be on the car processing the GET requests via WIFI and acting upon them.
The video below is the running 4-wheel drive robot car chassis kit. To get it working I used an Arduino. I will, of course, swap the Arduino for the Edison before Thursday. The motors are powered by battery, I think the Edison will still be powered by mains (but I am going to seek advice on the day).
As you can see I am all set ready for the FabLab Edison Hackathon: very excited.
Read : Ready for the FabLab Edison Hackathon
Edison Board Class (3rd Session)
03 November 2015
This week's post is short; I ran out of time before the next session.
At last week's session we where given a 5 minute challenge. The challenge was to make an LED light up when a button is pressed down. Here is the outcome of the 5 minute challenge.
And here is the code I came up with during the challenge.
var groveSensor = require('jsupm_grove');

var button = new groveSensor.GroveButton(5);
var led = new groveSensor.GroveLed(2);

function doLight(){
    led.write(button.value());
}

setInterval(doLight,300);
As you can see the button is plugged into D5 of the Seeed Base Shield. And the LED is plugged into D2. 'D' for digital.
In tonight's session we are going to be shown how to send data up to IBM's BlueMix. It going to be fun.
Read : Edison Board Class (3rd Session)
Edison Board Class (2nd Session)
26 October 2015
In last week's 2nd session of the Edison board class a lot of the time was spent making sure everyone was set-up ready to start making stuff. We were also introduced to the Grove Starter Kit Plus for the Intel IoT Edison Board.
The Grove Starter Kit Plus for the Edison Board is an interesting collection of sensors. The box includes many sensors, many LEDs, a buzzer, the base shield for Arduino and a stepper motor. Here is the full list of what's in the box:
- Base Shield v2
- Grove LCD RGB Backlight
- Grove Buzzer
- Grove Sound Sensor
- Grove Touch Sensor
- Grove Temperature
- Grove Light Sensor
- Grove Rotary Angle Sensor
- Grove Button
- Grove LED Socket with 3mm Red LED
- Grove LED Socket with 3mm Green LED
- Grove LED Socket with 3mm Blue LED
- Grove 3-Axis Digital Accelerometer(±1.5g)
- Grove Piezo Vibration Sensor
- micro-USB cable
Our homework; get something working with the starter kit. I thought I would have a play with the LCD RGB backlight screen and the temperature sensor. This is what I made:
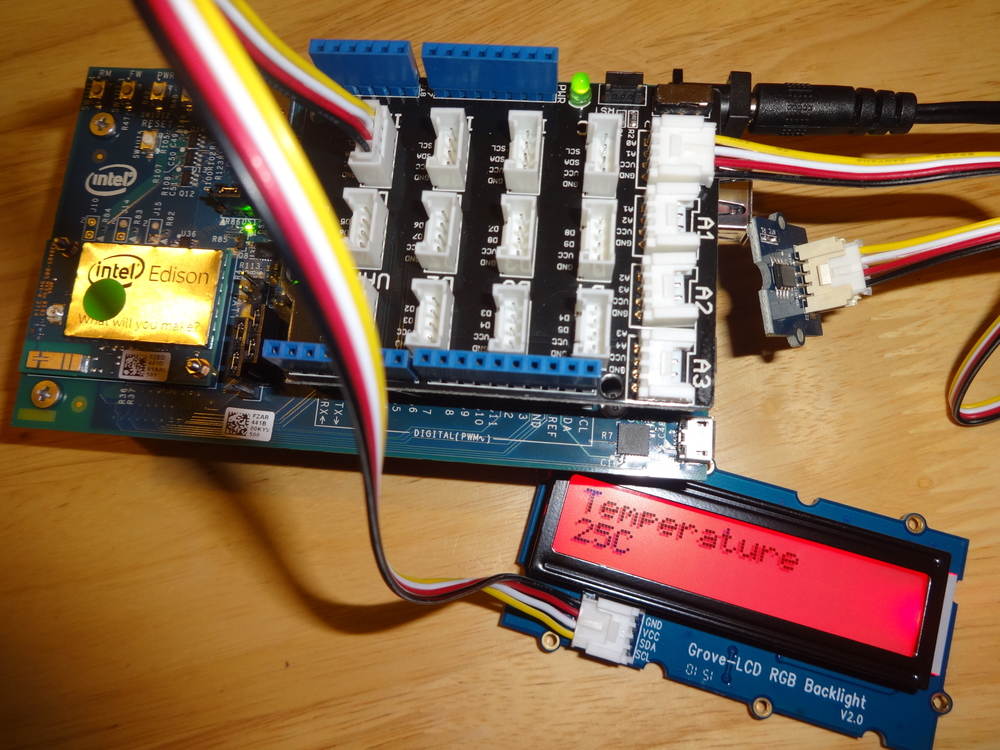
The code that I wrote for this is:
var jsUpmI2cLcd  = require ('jsupm_i2clcd');
var groveSensor = require('jsupm_grove');

var lcd = new jsUpmI2cLcd.Jhd1313m1(6, 0x3E, 0x62); // Initialize the LCD
var temp = new groveSensor.GroveTemp(0);

function doTemperature(){
    var value = temp.value();
    doPrint(value);
    doColour(value);
}

function doPrint(value){
    lcd.clear();
    lcd.setCursor(0,0);
    lcd.write("Temperature");
    lcd.setCursor(1,0);
    lcd.write(value.toPrecision(2) + "C");
}

function doColour(value){
    if(value <= 17){
           lcd.setColor(0, 0, 250);
    }
    if(value > 17 && value < 25){
           lcd.setColor(0, 225, 0);
    }
    if(value >= 25){
           lcd.setColor(225, 0, 0);
    }
}

lcd.setCursor(0,0);
lcd.write("Loading");
setInterval( doTemperature, 3000);
I found the Seeed Wiki to be a very good resource for getting going with the sensor and LED RBG screen.
That's it for this week. The next session is tomorrow. I will have an update soon.
Read : Edison Board Class (2nd Session)
Edison Board Now Supports Java
26 October 2015
Intel have announced that the Edison board now supports Java. This is good news for Java developers.
Read : Edison Board Now Supports Java