A Great Replacement for Google Reader
07 November 2013
Being able to consume RSS feeds online via Google Reader was awesome. One of the greatest things about Google reader was the ability to centralise your personal pool of RSS feeds. With Google Reader it was possible for some of the best RSS reader apps to synchronise with that pool. Finding a replacement to Google Reader that is as cool now that Google reader has gone has been difficult. However, I have finally found a replacement worth shouting about.
Tiny Tiny RSS is a Worthy Replacement
The replacement RSS reader that I have found is a self-hosted open source project named Tiny Tiny RSS. Tiny Tiny RSS is specifically designed to allow you to read your RSS feeds from any ware just like Google Reader was.
With Tiny Tiny RSS your RSS feeds are safely tucked away behind a login screen. They are tucked away on a URL where you put them. And I found it all simple to set up.
Once it is up and running you can access all of your feeds via a web browser and via apps. I will get to apps soon. Also, as an added bonus, in the Firefox web browser you can 'one click' subscribe to new feeds once you have enabled the Tiny Tiny RSS Firefox button. I think that is cool.

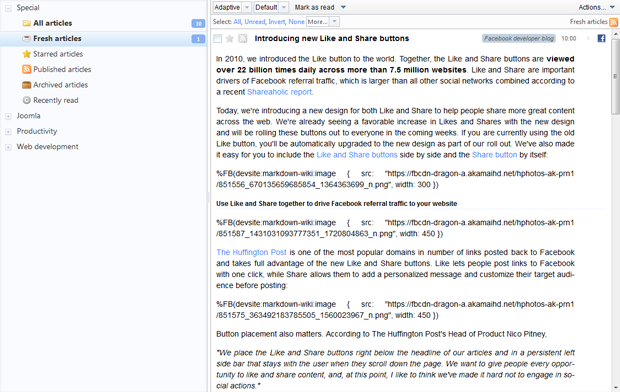
The Tiny Tiny RSS User Interface
Tiny Tiny RSS has a nice desktop style user interface that is Ajax driven. I have been finding my way around its user interface quite well so far. I haven't found any major user interaction defects yet.
The user interface provides a substantial preference area too. Its defaults have been chosen well as I have not needed to play with the preferences very much yet.
I found the user interface to be slightly slow in loading but, I admit, I haven't tweaked with anything server side.
RSS Reader Apps
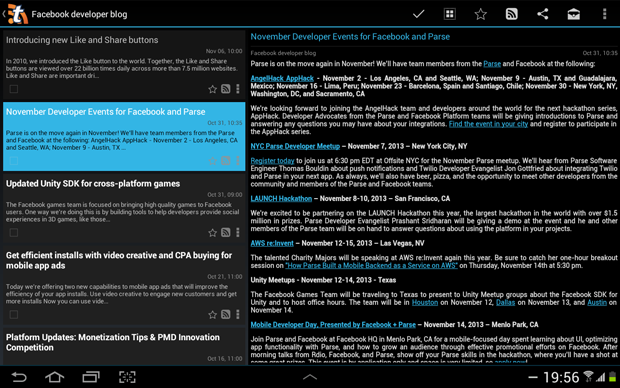
Online browser-based tools are great but, as you know, sometimes you need an app for that. On Google play there are several RSS readers that interact with Tiny Tiny RSS's API. I checked out an app called 'Tiny Tiny RSS' itself. But there are many more apps listed including free ones.

The Tiny Tiny RSS app works great. Once I provided my login details all the feeds that I have subscribed to via the web browser interface were instantly available via the Tiny Tiny RSS app.
Conclusion
I am totally sold on Tiny Tiny RSS as a replacement for Google Reader. For anyone who is confident with installing and self-hosting their own RSS reader software; I highly recommend Tiny Tiny RSS.
Why not subscribe to my RSS feed once you have Tiny Tiny RSS up and running for yourself? Thanks for reading this post.
You can get more information over at the Tiny Tiny RSS's project website tt-rss.org.
Read : A Great Replacement for Google Reader
Keeping Business Cards Relevant
19 July 2013
I don't know about you but my problem with business cards is I never give them all away before some of the information has become out of date. Whether the out of date information is a phone number or an email address, it is almost granted to change before getting to the bottom of the card stack.
I have been giving an out of date card for the last two years. I have been issuing each card with a line through an old phone number and giving an apology each time. Basically, I had given up trying to keep up with ever changing information and just went with what I had.
Then one day out of nowhere sat with friends on a beautiful sunny afternoon a solution came into my head. Reduce the information you give on the card and then the odds of out of date information will reduce too. I know it is obvious now! But it was not something I had paid much thought too.
So once I began thinking about what information I can reduce I asked myself: what do we have business cards for? It's a very simple answer: we give people business cards so people can find out more information about us and to contact us should the information agree with their needs. Again it is obvious, I know now, but it is in the making of the connections that matter.
I therefore realised that if you have a website that is in line with the goal of providing all the information people need, such as links to social media and ways to contact you, the card only needs to direct people there.
It also adds a spam firewall into the mix for free. Have you ever not given someone your card because they seem like they are a spammer? Well by directing new people to your website you get to see what they send you before giving away your email address. That is as long as your contact form handler does not send it to them for you.
Going with a card that only has your website address may be too minimal though. People may easily forget who to associate the card with. I thought a photograph is a good reminder of who they met. A picture should last ten years before people notice that I am aging away from it. As a male I am also unlikely to change my name so I thought that my name can be printed too.
Having a way of contacting you and a face and name to put the card to my just about be enough information. However, a job title is important, I thought, because it helps give a reason for why they may get in contact. I was careful to encapsulate what I do without being too specific as this is not necessarily timeless information.

Hey presto! I have a business card that should last the whole box. Check it out.
Read : Keeping Business Cards Relevant
How to Create a Fall-back Hyperlink Button
15 July 2013
Before CSS3 came along turning HTML 'A' tags into cool dynamic text buttons was not as simple as it is now. However, I had a solution that worked back then. Now I use this old solution to provide fall-back for the old IE browsers.
The first step in providing fall-back buttons for old IE with CSS2 is to follow an HTML pattern. This pattern puts a HTML 'SPAN' within the HTML 'A' tag. The 'SPAN' then wraps all the dynamic text as shown in the example below:
<a class="button"><span>BUTTON TEXT</span></a>
This HTML pattern means you get two items within the DOM to style. For this solution you need both items. As you will see below the outer item, the HTML 'A' tag, mainly provides a hook for the styling of the left hand side of the button. The inner item, the HTML 'SPAN' tag, mainly provides a hook for the styling of the right hand side of the button. I use the word 'mainly' loosely here because the CSS2 pattern works in accord.
.button,
.button:link,
.button:visited
{
    background: url("button.gif") no-repeat scroll left top transparent;
    padding: 0px 0 0px 28px;
    color:#FFFFFF;
    display:inline-block;
    width:auto;
    height:38px;
    border:none;
    cursor:pointer;
    font-size: .9em;
}
.button span,
.button:link span,
.button:visited span
{
    background: url("button.gif") no-repeat scroll right top transparent;
    padding: 0 40px 0 0;
    height: 38px;
    display:inline-block;
    border:none;
    line-height:38px;
    margin-right: -20px;
}
.button:hover,
.button:focus,
.button:active
{
     background-position: left bottom;
}
.button:hover span,
.button:focus span,
.button:active span
{
     background-position: right bottom;
}
You will notice from this CSS example that a background image is being used. Remember, the goal is to get rid of the image text. We get rid of image text because actual text is accessible and image text is not accessible.
This method turned out to be a good way to do buttons a couple of years ago. The background image makes it possible to have round corner and or horizontal gradients and or a graphic next to the dynamic text.
For the background you will need to put the button's normal default state and its hover state onto its own image sprite. I always opt for a silly length so that the dynamic text can also be a dynamic size on the X axis (limited at size silly of course). The sprite needs to be of a height dividable by two.
In your CSS the height and line-height needs to agree with the buttons background height. In the example CSS shown above the button is 40 pixels high. The HTML 'A' tag gets the left padding and the HTML 'SPAN' tag gets the right padding. This then gives you the flexibility to have horizontal centring or an offset to accommodate a graphic.
In the case of round cornered buttons you need a negative right margin on the 'SPAN' tag's CSS.
margin-right: -5px;
That's it. Check out the example CSS2 button.
I am thinking of making a tool soon that will produce the CSS and background image based on a specification given via an HTML form. Please let me know if you are interested in this tool by contacting me.
Read : How to Create a Fall-back Hyperlink Button
A Better Joomla 404 Error
08 June 2013
We humans recognize a 404 error as a page not found. That is helpful nevertheless the foremost reason of a 404 error code is to let the requesting computer know that the page was not found. Most of the online Joomla 404 error tutorials are missing the point and giving developers a method that is returning a 200 OK code.
Here is How to Set up a 404 with Joomla
First, create an article. The name of the article would benefit from being called 'Page Not Found' or something similar. Within the article's content tell your users what went wrong. Hit save and make a note of the article's ID number.
Then FTP into your theme folder's root and add a new file called 'error.php'. The 'error.php' file is an override that is called by Joomla automatically if a requested webpage cannot be found. Once you have added the 'error.php' page, paste in the first template you can find below. Swap out the placeholders.
<?php
defined( '_JEXEC' ) or die('Restricted access');
if (($this->error->getCode()) == '404') {
	echo file_get_contents('http://YOUR_DOMAIN/index.php?option=com_content&view=article&id=ARTICLE_ID');
}
This solution pulls in the content of the 'Page Not Found'. In fact it goes off and gets the whole page in its own request. Don't worry about the hideous looking URL - the users will never see it. Doing it this way will send the 404 error code back as well as the human readable error page your graphic designer crafted. FYI Joomla sets the 404 code in the header.
How Not to Set up a 404 with Joomla
Most online tutorials show a redirect method similar to:
<?php
defined( '_JEXEC' ) or die( 'Restricted access' );
header("HTTP/1.0 404 Not Found");
header("Location: http://YOUR_DOMAIN/404");
exit;
The problem with this is the redirect will resolve with a 200 OK code. A 200 OK code tells the browser that the request was all ok. That is not good for Google! You need to tell Google that the page could not be found too.
Read : A Better Joomla 404 Error
Reduce Requests and Style Social Media Buttons
06 June 2013
The ever growing social media buttons are request culprits! But you can reduce the request they make and style social media buttons your way by following this simple article.
What Makes Social Media Buttons Request Heavy?
The social buttons are not only requested via your webpage; they are also requesting their own assets once they have loaded. This means several requests are made for each button. Each of these request are slowing down your web page's loading speed.
Creating a GET request that mimics the request that each social media button's JavaScript would otherwise construct will keep the extra requests made down to zero. If the button is clicked only then will a request be made.
How Can I Style Social Media Buttons?
As you are creating the mark-up for the button yourself, you are free to style the link as you wish. Tip: to keep the requests down, add the network's logos to your image sprite.
It is worth noting: the user interaction design principle of continuity. The principle's sub-principle of external continuity would suggest styling the buttons to look like the network's own buttons. Following this principle would suggest your users will already know what your buttons do and how to use them.
Here are Template Links for Social Buttons
Just swap out the UPPER CASE placeholders below . Don't forget to URI encode your variables.
http://www.facebook.com/sharer.php?s=100&p[title]=YOUR_TITLE&p[summary]=YOUR_SUMMARY&p[url]=YOUR_URL&p[images][0]=YOUR_IMAGE_TO_SHARE_OBJECT
https://twitter.com/intent/tweet?hashtags=A_HASH_TAG&related=RELATED&text=YOUR_TITLE&url=THE_PAGES URL&via=THE_CLIENT_HANDLE
http://www.linkedin.com/shareArticle?mini=true&url=URL&title=YOUR_TITLE&summary=YOUR_SUMMARY&source=THE_CLIENT_NAME<
Google Plus
https://plusone.google.com/share?url=URL
For the maximum effect combine these links with open graph and twitter cards. Twitter lets you use Open Graph where a meta tag exists. This is good as you get a twitter card as a bonus when adding Open Graph. Here is the perfect mix of the two.
The following template needs to be added in the <head> of the HTML document.
<meta name="twitter:card" content="summary">
<meta name="twitter:site" content="@ TWITTER NAME ">
<meta name="twitter:creator" content="@ TWITTER NAME ">
<meta property="og:title" content="">
<meta property="og:image" content=" AN IMAGE ADDRESS ">
<meta property="og:site_name" content=" SITE NAME ">
<meta property="og:description" content="">
<meta property="og:url" content="">
<meta property="og:type" content="article">
Add the following to each link and you will get the buttons to open in a small window just like how the social network's own buttons work.
onclick="javascript:window.open(this.href, '', 'menubar=no,toolbar=no,resizable=yes,scrollbars=yes,height=600,width=600');return false;"
Read : Reduce Requests and Style Social Media Buttons